Anyone Can Cook: Avocado Toast

For those of you who follow me on Instagram, you know I love my avocado toast. Today, I’m sharing how I whip up a fast yet satisfying meal with this tutorial! First stop, the ingredients. You’ll need one avocado (obviously haha) as well as one or two eggs (I ended up using two with one for each slice of bread but could also use one and make a sandwich). For bread, this’ll depend on what kind you are using. For example, in this version I used sour dough and was able to use one slice per half of the avocado. When I used wheat bread, the slices were not large enough to carry that much avocado on them so I used four slices and split each half of the avocado in half for each slice. Had I not done that, the slices would have cracked and things would’ve gotten messy. To cook with, choose any oil you prefer – I chose coconut oil since it’s healthy and also has a high smoke point (so it’s harder to burn food with). I topped the toast off with some sea salt, ground black pepper and red chili flakes for a little kick – again, these you can shift to your liking.

IMG_4060

First step, toast your bread. The bread doesn’t really need to be crazy hot to enjoy this dish but does need to be hard so it can have a nice crunch with the gushy avocado. In the mean time, cut the avocado into two halves (and if needed cut in half again depending on how many bread slices you’re using). Be very careful as you need to move the avocado in a circle as you cut (the seed is too big to just cut right through). It should look similar to the picture below. After that, remove the seed and scoop out as much as you can. Best way to do this is to take a spoon and carve around the inside edge all the way around – it should just pop out altogether.

IMG_4059IMG_4066

Now that the avocado is de-skinned, plop each half onto a bread slice and mash with a fork – quicker than a knife and looks cool. Ta dah! On to the eggs…

IMG_4067

Add 2 spoonfuls of oil to a small skillet pan with low to medium heat. Once the oil liquifies, add the egg. Be sure to drop it in as close to the pan as possible so that the impact doesn’t cause the oil to splash you (like it did to me, ugh).  Once everything solidifies (clear to white), you’re ready to serve it on the toast.

IMG_4069IMG_4073

Now that the eggs are on their slices, season to taste. I usually did the salt first, then the pepper and finally the chili flakes  – that way I could monitor how much spice I wanted. Make sure a little of each makes it to the avocado as well as the egg, that way you’re not left flavorless on the parts where the egg doesn’t reach.

IMG_4074IMG_4075IMG_4076

DONE! Yay!!! Now the best part, breaking the yolk! This is the best tasting part of the toast according to my preferences but fair warning it does get messy fast. I usually try to spread it across the toast if I can and also fold it over like a sandwich to dip into the yolk that fell on my plate. Mmm..

IMG_4079IMG_4081IMG_4083


Now you’ve got a quick and easy, oh-so-tasty treat to make before running off to work. If you end up making this for yourself, send me a picture! I’d love to see how you did it 🙂

Thanks and see you next post!

Anyone Can Cook: Quick Tips from the Italian Kitchen

I loved coming out of my comfort zone and taking a cooking class in Italy. I was so worried about messing up all my meals – or being the (former) picky eater I am, that I wouldn’t eat them. I was so surprised that all of them turned out fine AND I loved every. single. one. Going from having the shortest list of foods probably anyone has ever liked to expanding my palette to a normal person’s was such a relief. Now every time I go out to eat I always try to eat different things besides the same meal every time I stop by.
Here are a few tips I picked up in the class along the way:
1) Cook pasta with salted water & cook “al dente” or partially cooked – salt adds flavor and al dente doesn’t let the bad starches get released from the pasta (therefore healthier). Also, do not put a lid on it – just put it on high and it’ll cook faster (plus the lid makes them soggy). Side note: do not EVER crack spaghetti in half before putting it in! It will release those starches if you do and its best for the flavor to just put it in as is and then stir it in to fit it once it’s cooked a little bit.
2) When making spreads for things like pesto and cannoli filling, use a sifter to make it smooth instead of clumpy and scrape the bottom to get it all out (also used for sauces so things used for flavor like Rosemary are not in the sauce while cooking but still have the flavor and can cook evenly.
3) Adding salt to veggies stops the chlorophyll from producing, which is why it’s important to do so.
4) Always taste your dish as you make it to make sure it cooks correctly & add more salt/pepper accordingly. You can’t tell what your food will taste like unless you taste it.
5) Put a wet paper towel under your cutting board so it doesn’t slip when you use it – could risk an injury otherwise.
6) Olive oil was mainly used to preserve things like basil in pesto and veggies in ribollita and bread in papà alla pomodoro. Olive oil doesn’t just need to be used for cooking purposes.
7) Besides adding more oil to something that is cooking quickly and needs to be slowed so it doesn’t burn (like sauce or garlic) – use salted pasta water/stock instead & then just add salt if the flavor is watered down. This is healthier and adds to the flavor of the dish too.
8) If a meal is served hot/cold – make sure the dish that it’s served in is of the same temperature too so the meal doesn’t get cold/melt faster. Example: when serving pasta, take a ladle full of the hot pasta water and put it in the bowl to heat it up, then get rid of it once the pasta is ready and serve. If serving Tiramisù, put the serving bowls into the fridge along with the mixture so they keep it cold longer when served
9) If using an ingredient that oxidizes (turns black or other colors when cut & exposed to air) quickly, like artichokes, rub it with a slice of lemon or have it soak in water with lemons inside if you want more lemon flavor to keep it from oxidizing.
10) New tools I learned about: slotted spoon – a big metal spoon with holes in it to serve pasta without using a drainer – I did not drain my pasta once and only used this in class. Another is an immersion blender – a hand held blender used to make sauces and is so light in weight yet so powerful. A pasta machine can prep pasta/cannoli shell dough with flour first and flatten, then can send it into the machine to roll out flat so you can cut and make the correct shapes.
11) To cook meats evenly (or anything really), cut them so they all resemble the same shape before cooking.
12) How to “clean” meat – cut off the fat (on red meat it’s the little white parts) of the meat to remove the chewy/bad tasting parts before cooking so that it tastes better.
I learned a lot over the course of four months so I thought I’d share the wealth.
Let me know of any other cooking tips you have found below!
Ciao!

Diamonds of the Kitchen: Truffles

For those that know me, you know that I haven’t stopped talking about truffles since returning to the States – and it’s not the chocolate ones. These so-called “diamonds of the kitchen” are flavorful little fungi that grow near the roots of trees in Italy & France. The only type I can speak on are the Italian kind but if you want to know more about these little beauties and why they are amazing keep on reading!!
So what makes these so rare and expensive? Well, one reason is because both white truffles as well as black can’t be found without the help of dogs (and sometimes pigs, but that’s more of a French technique) to find them. They are also only found in Italy and France (nowhere else) and only grow during a certain time of year. In fact, they hold a festival every September to celebrate the start of the truffle hunting season!
Truffles can be purchased in a variety of ways, one being the ever-famous truffle oil.
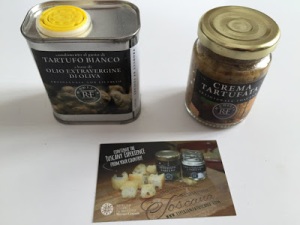
White truffle oil is sold in a can (keeps the oil fresh longer) or a glass bottle. No oil actually has truffle in it, though, instead the white truffle is put in olive oil and then after the aroma is released, the truffle is removed. When purchasing truffle oil, make sure it is authentic (only lists white truffle aroma and olive oil as ingredients) but you don’t need to spend a fortune on it since there is no actual truffle still in it. Pricing can run from 10 euros and up depending on the quantity purchased.
10e80-img_9927
Fake oils have a chemical in them as well as the olive oil and aroma – you can tell if you taste the oil and you immediately taste the truffle (if it’s real, you first taste the olive oil then the truffle since the truffle is put in the bottom of the bottle and should take time to come through.
Truffle has a very strong taste so either you love it or hate it. The best way to use the oil is mainly pasta and bread, but also can use with salad or just about anything savory.
b9521-img_2577
Truffle Oil Gnocchi
White truffles are more expensive and more prized than black truffles since they are harder to find and taste better as well as a shorter season for harvesting. The most expensive one was a world record size and went for 330,000 euros – no joke!!
Black truffles, on the other hand, are still expensive but are more accessible than white truffles and so are cheaper. These truffles can be sold as is to be grated over dishes, mixed with porcini mushroons into a creamy spread, or cooked whole.
b8e1e-img_2702
Black Truffle Gnocchi
ec1bf-img_2524
Black Truffle Ravioli with White Truffle Cream Sauce
32bc3-img_9915
Black Truffle Fries
4999f-img_9916
Black Truffle Carbonara with White Truffle Oil
b65de-img_2527
White Truffle Oil Pizza Topped with Black Truffle
Black Truffle Cream, Pecorino and Salami Sandwich
 
Is your mouth watering yet?

If you don’t believe me, try some the next time you see it on a menu!

One place to look for is Zaza’s – they have multiple menus and one is dedicated to all things truffle!! Almost all of the black truffle meals pictured are from there (except the pizza and sandwich).

That’s all for now – ciao!